


AWS Cross-Account role access using Python
To help centralise security and provide controllable levels of access, AWS provide a way of access multiple accounts by allowing one user to assume a role in another account and use the permissions attached to that role.
This is useful for keeping all of your IAM roles in one central account if you use multiple accounts for different environments, which can be a good way of isolating your resources. For example, you could set up distinct groups in a central account with differing levels of access, such as providing developers access to dev and test accounts, but limiting your production account access.
The steps here to setting up cross-account access are the same for console and programmatic access, then I've written a python demo and shared it on GitHub to show this in use and how you can use the cross-account roles to gain temporary credentials.
The GitHub repository for this is here: https://github.com/uzusan/aws-crossaccount-example
Account Setup
This section will show you how to set up the cross account roles on two existing accounts. You can add these to any 2 accounts, created by the usual sign-up process or by using Organisations (which gives the additional benefits on centralised billing)
Target account
The first bit to set up is in your Target account. To do this, you need to set up:
- Role for use by the users accessing the Target account from the Source account. This role should have:
- Trust Account. This is the Account ID from your Source account.
- External Id. This is a string you create, it can be something descriptive or random.
- Permissions you want to give. This role is what your users will use, so add the permissions you want them to have to this role. In this example, I've used the AmazonS3ReadOnlyAccess policy.
In the Target Account, chose Create Role
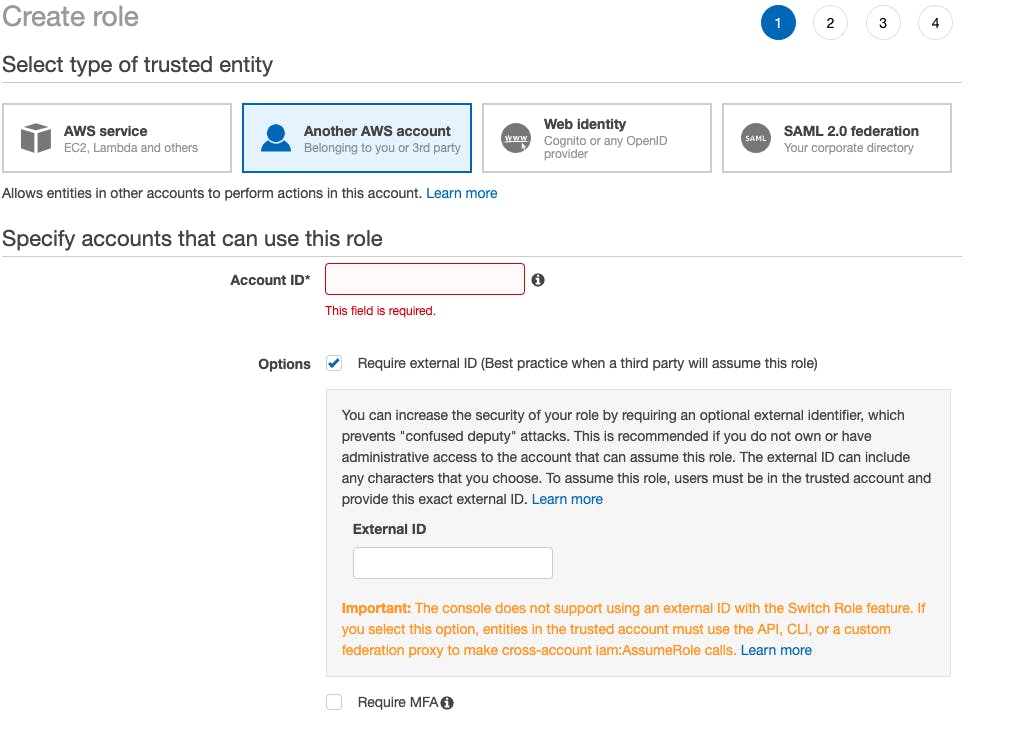
- Choose the "Another AWS account" option for trusted entity.
- Enter the Account ID from your source account
- Tick the Require external ID option
- Enter your External ID string. You can use something like DeveloperAccess. Keep a note of what you enter here.
- Click Next:Permissions
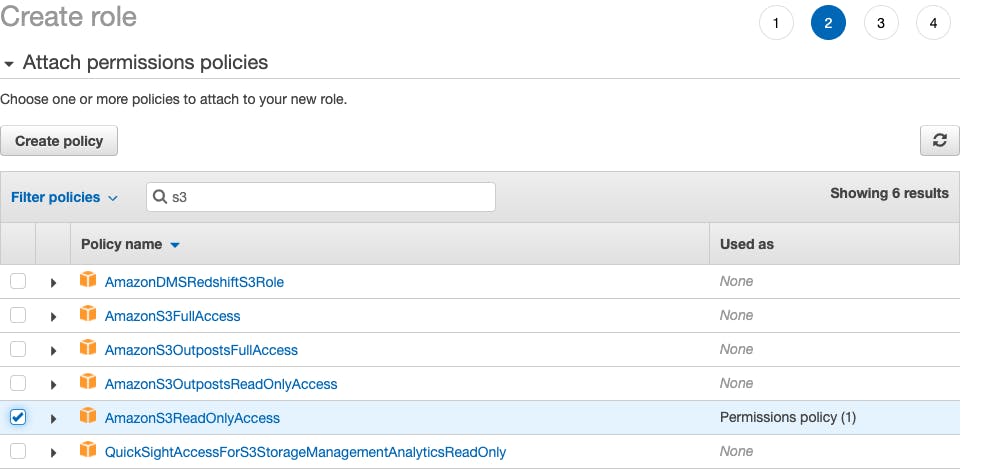
From here, add your permissions. I've added AmazonS3ReadOnlyAccess but you can also create new policies for your permission sets here by clicking Create Policy:
Add some tags if you wish and finish up. Take a note of the Role ARN.
Source account
In your source account, you now need to set up a profile to allow for cross-account access, and an IAM user to use the policy.
To do this, set up:
- A Profile with the permission sts:AssumeRole and the resource from your Dev account.
You can do this by using the wizard or adding a JSON policy.
An example is below:
{
    "Version": "2012-10-17",
    "Statement": [
        {
            "Sid": "VisualEditor0",
            "Effect": "Allow",
            "Action": "sts:AssumeRole",
            "Resource": "arn:aws:iam::123456789012:role/TargetAccountRole"
        }
    ]
}
You can then create an IAM user and attach this policy. Make sure you give the user programmatic access for the Python part. Console access can be used to access the Target account after signing into the Source account.
Using in the Console.
To add a role switching menu item, you need to will need the Account ID of the Target account, and the Role Name you have set up in the Target account.
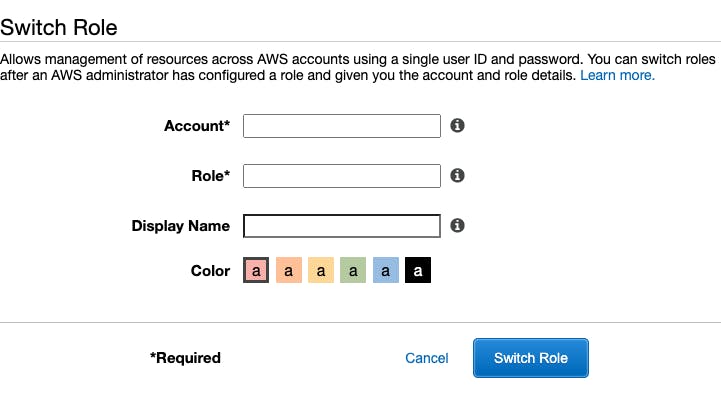
You can then give this switcher a role and colour to differentiate multiple role switches. Clicking Switch Roles will then log you into the console of the Target account.
Use in Python
Once you have the IAM user, the policy, the Target Role and the Target ExternalId you can use these in python to connect to another account by requesting temporary credentials from the Secure Token Section (STS) and using these to set up a client or session connecting to the Target account.
An example of doing this is in my GitHub account: https://github.com/uzusan/aws-crossaccount-example
You can follow the example there, but I will provide explanations of what is happening in each section.
Setup
First, you need to set up your IAM user from above that has access to sts:AssumeRole. You can do this in multiple ways, but this example uses profiles.
To do this, edit your AWS Config file, on Linux and Mac OS this is in: ~/.aws/credentials On Windows it's: C:\Users\username.aws
You can then add a section for your credentials that contains your programmatic access key and secret key:
[Dev]
aws_access_key_id = YOURKEY
aws_secret_access_key = YOURSECRET
You can find here further information on setting this up: AWS Configure CLI Userguide
Python
The example above has extra code to handle things like argument passing and error handling, so it's worth reading through the readme on the GitHub repo to get a fuller picture, but in this blog post I'll go through the Boto3 python code required to use a cross-account role.
Boto3 is the AWS python library for performing actions in AWS and is used heavily in Python code that deals with AWS.
More information can be found here: Boto3 Documentation
Assuming the Role
The first step is to connect to Boto3 using the profile set up in the previous step.
session = boto3.Session(profile_name = profile)
This tells Boto3 which profile to use on disk.
The next step is to assume the role. To do this, you need the Role ARN from above, the External Id and a name for your session. This can be anything, I use something like DevSession. To do this, the first call is to create a client for the STS service.
Once you have a client, you then need to assume the role you set up. This will then return a set of temporary credentials. This is a set of credentials comprising an Access Key ID, the Secret Access Key and a Session Token.
These are then used to set up your clients or resources calls to Boto3 to provide access to the Target Account.
The assume_role documentation is here: Boto3 STS assume_role
    sts_client = session.client('sts')
    sts_response = sts_client.assume_role(
        RoleArn = rolearn,
        RoleSessionName = sessionname,
        ExternalId = externalid
    )
The response from the assume_role command will give you the 3 pieces of information you need:
# Get our new temporary credentials.
# Checking each key is present just to ensure we have what we need.
if ("Credentials" in sts_response):
    credentials = sts_response["Credentials"]
    if ("AccessKeyId" in credentials):
        temporary_access_key = credentials["AccessKeyId"]
    if ("SecretAccessKey" in credentials):
        temporary_secret_key = credentials["SecretAccessKey"]
    if ("SessionToken" in credentials):
        temporary_token = credentials["SessionToken"]
You can then start using your new credentials to set up access to the various clients that Boto3 provides. From here, this is where you would change to your own use cases. In this example, I'm going to set up an S3 client, then list the buckets in the account. The role has S3 read only access to allow this.
The client call documentation for S3 is here: Boto3 S3 Client
(Note the example uses boto3.client, here we use the session we set up earlier. As we are passing in the credentials, both work the same).
    # next we list the buckets. Note that even though we are using the endpoint
    # above in eu-west-1, s3 is global, so list buckets will return all buckets.
    # to get just one region, you can call get_bucket_location on each bucket returned and filter by the LocationConstraint
    s3_client = session.client(
        's3',
        region_name = "eu-west-1",
        aws_access_key_id = temporary_access_key,
        aws_secret_access_key = temporary_secret_key,
        aws_session_token = temporary_token
    )
Once you have the client set up, you can then call the list_buckets call:
response = s3_client.list_buckets()
More information on this call can be found in the Boto3 documentation: Boto3 S3 list_buckets
This will return a list of the buckets in the account. The response syntax is below:
{
    'Buckets': [
        {
            'Name': 'string',
            'CreationDate': datetime(2015, 1, 1)
        },
    ],
    'Owner': {
        'DisplayName': 'string',
        'ID': 'string'
    }
}
And that's how you set up cross-account roles in AWS and use them in Python. If you have Questions or feedback, let me know and I’ll try to answer them for you.